


Step #1
GSI Control Center
Download GSI Control Center. Upon installation, follow the instructions based on your GSI model. The installer will download all the necessary elements you need for smooth operation of your GSI model such as drivers and LED profiles. With GSI Control Center, you will be able to set on board functions for clutch calibration, clutch bite point, dead zones and master clutch selection.
USB CONNECTION
We recommend using one of the following connection methods:
GSI Coiled Cable → Powered USB Hub → PC
GSI Coiled Cable → Active USB Repeater → PC
Step #2
Display Setup
GXL Pro owners, skip to step 4.
Make sure you have installed the screen drivers either through the GSI control center installer or installing the drivers individually.
Once the wheel is plugged in, the LEDs will illuminate in solid red. This indicates the screen and the LED lights are operational and ready for instruction from your sim data software of choice. (SimHub, JRT or Z1). We will continue with SimHub as it controls both dash and LED output.
INDENTIFY DISPLAYS
Before following the steps, be sure to identify which display is in your FPE.
You can identify which display is in your wheel by it’s reflectiveness:
GLOSSY DISPLAY
VoCore (Current)
MATTE DISPLAY
USBD480 (Legacy)
-
Open SimHub, click ‘Devices’ in the sidebar.
-
Click "Add device"
-
Select your display in the "Pick a supported device" screen:
- Generic VOCORE (New GSI Models)
- Generic USBD480 without Touch
- Generic USBD480 with Touch
-
Set ‘Display refresh rate limit’ to 20 FPS (USBD480 only).
-
Ensure ‘Flip display (180º)' is unchecked.
-
Select your GSI Dash or your dash of choice from the ‘Displayed dashboard’ dropdown.
NOTE: Unless you are part of the simOS beta, please DO NOT select any GSI wheels from the menu that opens, but select one of the following displays instead:

SimHub VoCore Settings

SimHub USBD480 Settings
Step #3
RGB LED Setup
- Navigate to the Arduino section and click the “My Hardware” tab. Here make sure “Single Arduino” is selected. Your FPE wheels onboard Atmega32U4 Arduino will appear under “Detected Hardware”
- Test LED function by navigating to the “RGB LEDS” tab. Once there click “Open data test editor” In the pop up click “game running” select a car model and slide the “RPMS” slider to test the onboard LED lights.
- If your Arduino is not being detected, restart the app and wait 10 to 15 seconds for it to load the microcontroller. If this has no effect, restart your computer with the wheel attached and this usually solves the load failure.

SimHub Arduino Settings
IMPORTANT!
DO NOT attempt to program or upload a new Arduino sketch using SimHub to the GSI wheel. The red status LEDs on startup is indication the GSI Arduino sketch is active and operational. Any attempt to upload a new sketch will disable the wheels LEDs and will need to be sent back to GSI for reprogramming at the users cost.
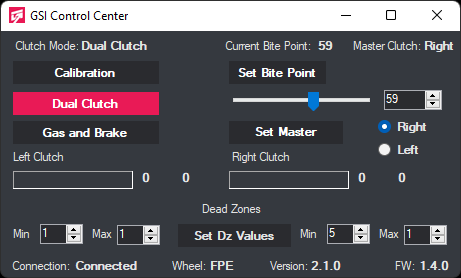
Step #4
Dual Clutch Setup
With the wheel plugged in, calibrate both clutches by clicking the Calibration button in the GSI Control Center app, then pull both clutches release. Your clutches are now calibrated.
- After calibration, click either the Dual Clutch or Gas and Brake option buttons.
- For Dual Clutch, set the “bite point” by adjusting the bite point slider or inputting the value manually.
- If the sensors are too sensitive, add a Min Dead Zone to clear any low range inputs coming from the clutches.
Have an issue?
Troubleshooting
For proper operation, you need to have a clean, reliable USB data throughput signal and the absence of EMI (Electrical Magnetic Interference) from other devices.
- Connect wheel via a powered USB hub or directly to computer.
- Avoid excessively long USB extension cables. Data degrades on longer USB extensions.
- AMD systems with widely known poor USB performance update to AGESA bios 1.2.0.2 or higher. (check your motherboard manufacturer website)
- Check for EMI (Electrical Magnetic Interference) and ground rig if needed.
- Try alternate USB ports if one port is not performing to spec.
- Check coiled cable to make sure cable housing is screwed on tight.
- USB shares data throughput with all devices on the system. Make sure you are not overloading the USB tree.
- Use a dedicated PCIE USB card. (We recommend NEC chipset cards)
1.1. Warnings & instructions for safe usage
- WARNING: CHOKING HAZARD - Small parts, adult supervision required! Never let children use the GSI steering wheel, or any of the provided parts or tools without supervision by an adult.
- Never use damaged or in any way defective product, stop using it and contact the reseller or the manufacturer.
- Use protective gloves when changing or adding parts to the steering wheel, or when removing parts from it.
- Always make sure everyone using the GSI steering wheel have read and understood the content of the manual above.
- Always check that all connections and quick releases are tightened before using the steering wheel.
- DO NOT open the steering wheel.
- The GSI steering wheel or any of its parts may not be used for any other purpose than what they were designed for. GSI products are meant to be used as an USB-input device on a computer. DO NOT USE IN A REAL CAR! The manufacturer is not liable for any damage that may result from using the product in violation of the instructions.
- Always fasten the GSI steering wheel to the direct drive base with M5 bolts (6 pcs). It is the user's responsibility to ensure that the platform can withstand the use of the GSI steering wheel.
Operating environment and safe storage conditions
- 15°C – 35°C temperature, non-condensing humidity.
- Do not expose the GSI steering wheel or any provided parts to direct sunlight or moisture.
- Indoor use and storing only.
Warranty
The product has a 1-year warranty, excluding situations and events where:
- Instructions for use or care have been disregarded.
- The product has been used incorrectly or carelessly.
- An accident or other event has occurred after the product has been handed over, in which the product has been damaged by external factors.
- Normal wear and tear in use.
CE-Marking
Product meets EU standards for health, safety, and environmental protection.
Manufacturer: Gomez Sim Industries LLC
Manufacturer address: 1167 Mississippi Ave #100, Dallas, Texas 75207

Need Help?
Contact Us
Every GSI product is made with loving care and craftsmanship. Providing excellent customer service is always paramount.